
 By
By 
Setting up a WooCommerce product configurator feels overwhelming when you're staring at complex integration options and don't know where customers actually abandon their carts.
I'll walk you through the exact 3-step process I use to get clients from zero to selling custom products through WooCommerce in under 4 hours - the same system that helped 200+ stores increase conversions by 40-60%.
Key Takeaways:
- Start with proper WooCommerce product setup (simple product, empty description)
- Image preparation is 80% of success - invest time in quality transparent PNGs
- Use Global Settings for base price and Cart Form selection
- Premium addons transform basic configurators into professional sales tools
Last week, a WooCommerce furniture store owner came to me frustrated. Their handcrafted dining tables were getting tons of traffic - customers would spend 15+ minutes browsing different wood finishes and hardware options. But here's the problem: only 1.8% were actually buying.
Sound familiar?
The issue wasn't their products (they were gorgeous). It wasn't their prices (competitive). The problem was their customers couldn't visualize what their custom table would actually look like with walnut finish and brass hardware.
Here's what I've learned from setting up 200+ WooCommerce product configurators: When customers can't see their exact choices in real-time, they don't trust what they're buying. And when trust is missing, sales disappear.
The furniture client? After implementing the system I'm about to show you, their conversion rate jumped to 6.4% in just 6 weeks. Same traffic, same products - but now customers could see exactly what they were getting before adding to cart.
Step 1: WooCommerce Product Configurator Installation (30 Minutes)
Before diving into the technical setup, let's make sure your WooCommerce store is ready. I've seen too many people rush this step and spend hours troubleshooting compatibility issues later.
WooCommerce Compatibility Check
First things first - check your WooCommerce version. You'll need WooCommerce 6.0 or higher for optimal WP Configurator integration.
Check your version:
- Go to WooCommerce → Status in your WordPress dashboard
- Look for the WooCommerce version number
- If you're running anything below 6.0, update before proceeding
⚠️ Common Mistake: Skipping the compatibility check. I had a client who spent 3 hours wondering why their configurator wasn't working, only to discover they were running WooCommerce 5.2.
Install WP Configurator Plugin
Head over to WP Configurator and grab the plugin for $79. After working with dozens of configurator solutions over 7 years, this is the one that actually integrates seamlessly with WooCommerce.
Full disclosure: We're affiliate partners with WP Configurator, and your support helps fund these free tutorials. But I'm not just recommending it for commissions - I actually co-created this plugin before successfully exiting.
Installation steps:
- Download the plugin ZIP file from your purchase
- Go to Plugins → Add New → Upload Plugin in WordPress
- Choose the ZIP file and click Install Now
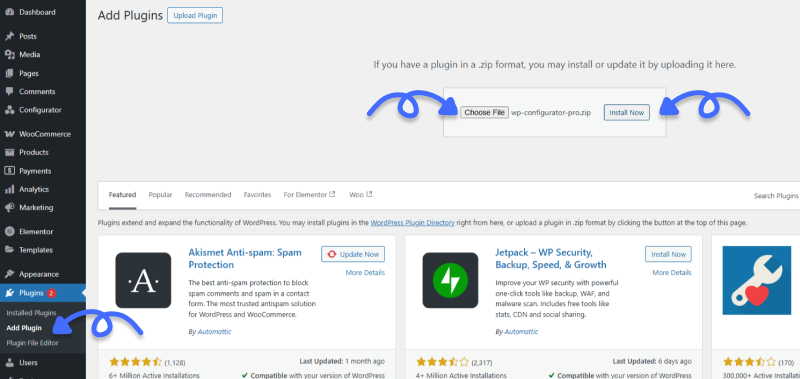
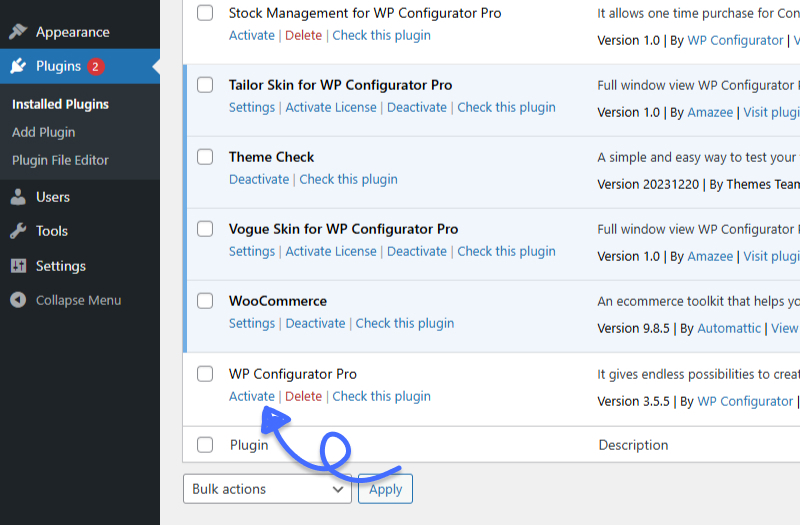
- Activate the plugin
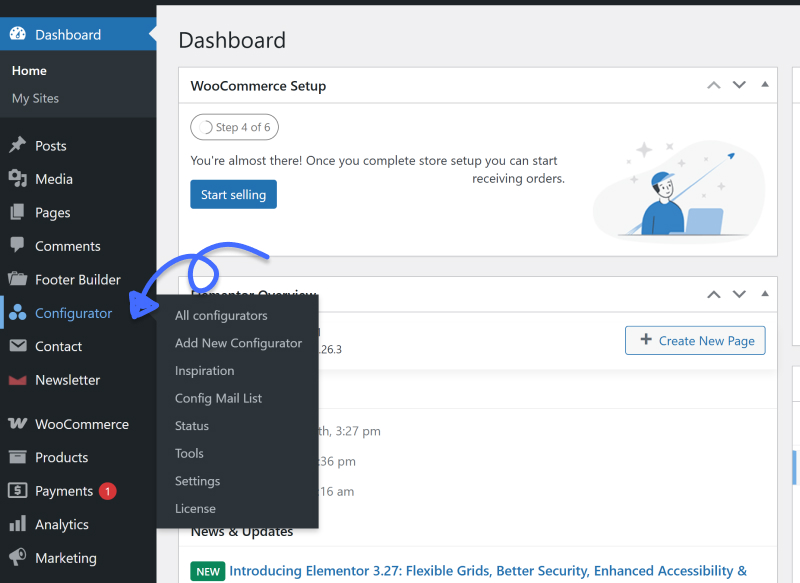
- You'll see "Configurator" appear in your WordPress menu
Step 2: Configure Your First WooCommerce Custom Product (2 Hours)
This is where the magic happens. We're gonna build your first configurable product step-by-step using a custom water bottle as our example.
Create Your WooCommerce Product Foundation (30 minutes)
Start with WooCommerce, not the configurator. This is backwards from what most people think, but trust me.
Create the WooCommerce product first:
- Go to Products → Add New in WooCommerce
- Product title: "Custom Water Bottle"
- Product type: Select "Simple Product" (not variable!)
- Don't add any product images or content - leave description area completely empty
- Set any price (this won't be used - configurator controls pricing)
- Publish the product
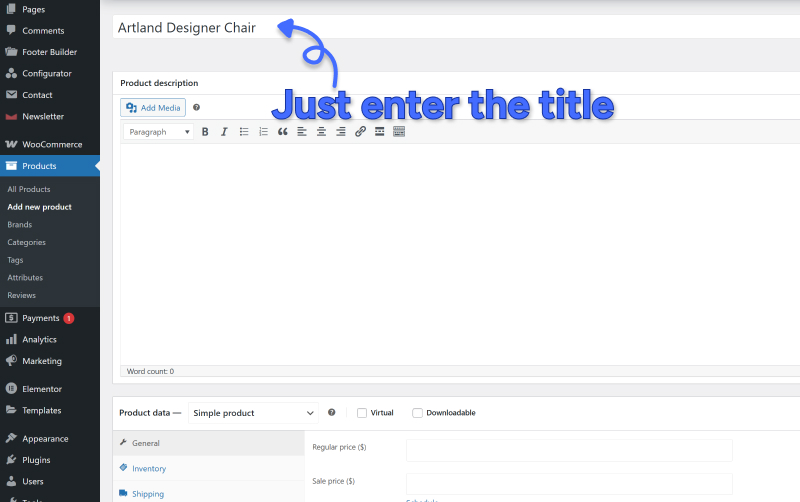
⚠️ Critical Mistake: Don't add any content to the WooCommerce product description. If you do, WP Configurator expects that content to be shortcodes for manual placement. For automatic integration, leave it completely empty. Learn more about shortcode placement in our Complete Guide.
Image Preparation - The Make-or-Break Factor (45 minutes)
This is where 80% of configurator projects succeed or fail. Your images need to be perfect because customers judge your entire business based on how professional the preview looks.
Watch this detailed tutorial on creating layered images in Photoshop - it explains the complete process step-by-step.
Image requirements:
- Format: PNG with transparent background (not JPG!)
- Dimensions: Consistent across ALL images (1200x800px max)
- File size: Under 200KB each (use TinyPNG to compress)
- Alignment: Each variation positioned exactly the same
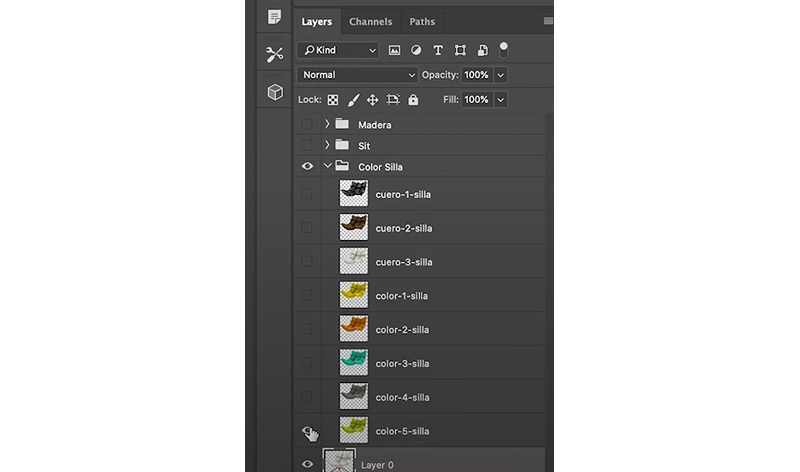
Water bottle example - you'll need these separate images:
- Bottle body variations: Red, blue, green, black bodies
- Cap variations: White cap, black cap, sport cap
- Accessories: Carabiner clip, wrist strap (optional)
File naming that saves hours:
Use this pattern: productname-part-variation.png
Examples: waterbottle-body-red.png, waterbottle-cap-white.png
💡 Pro Tip: If you're not comfortable with image editing, hire a designer on Fiverr. Give them one reference photo and a list of variations. Typical cost: $5-15 per variation. It's worth getting this right.
Building Your Configurator Structure (45 minutes)
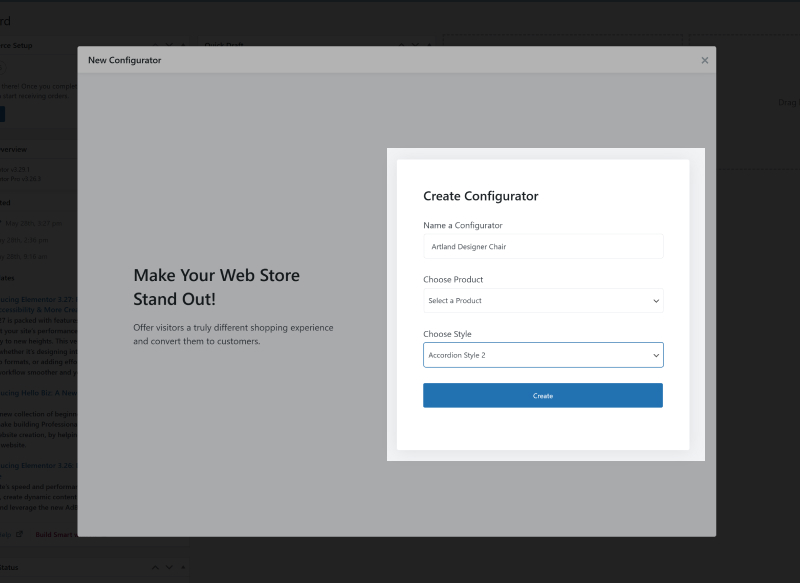
Create your configurator:
- Go to WP Configurator → Add New Configurator
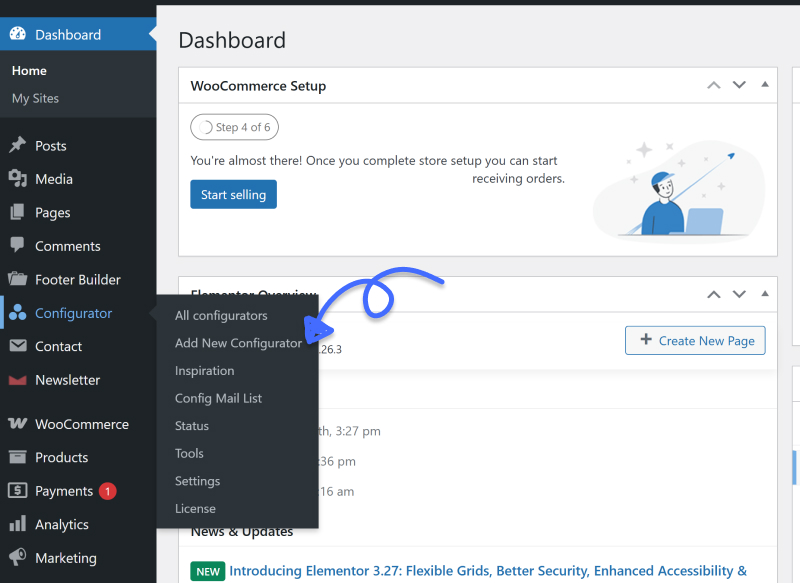
- Configurator name: "Custom Water Bottle"
- Link WooCommerce product: Select the product you created
- Choose skin: Start with "Accordion Style 2"
- Click "Create Configurator"
Build your product hierarchy:
Think like a family tree. Groups are categories, layers are individual options.
├── Bottle Color (Group)
│   ├── Red (Layer)
│   ├── Blue (Layer)
│   └── Green (Layer)
├── Cap Style (Group)
│   ├── Standard Cap (Layer)
│   └── Sport Cap (Layer)
└── Accessories (Group)
    ├── Carabiner Clip (Layer)
    └── No Accessory (Layer)
Creating groups and layers:
- Click "+" in the left panel → "Add Group"
- Rename to "Bottle Color"
- Set "Is Required" to Yes
- Select your group, click "+" → "Add Layer"
- Rename to "Red" and repeat for other colors
Configure each layer:
- Click on the layer to select it
- Layer type: Choose "Product Image"
- Upload image: Select your transparent PNG
- Display option: Choose "Color Swatch" and pick the actual color
- Additional price: Leave blank for standard, add cost for premium options
💡 Pro Tip: Always set one layer in each group as "Active on Load" so customers see a complete product immediately.
Set Your Base Price in Global Settings
Critical step most people miss: The base price must be set in the configurator's global settings, not in the WooCommerce product.
To set base price:
- In the configurator editor, click the cog icon (Global Settings)
- Find "Base Price" field
- Enter your starting price: $25
- Save your configurator
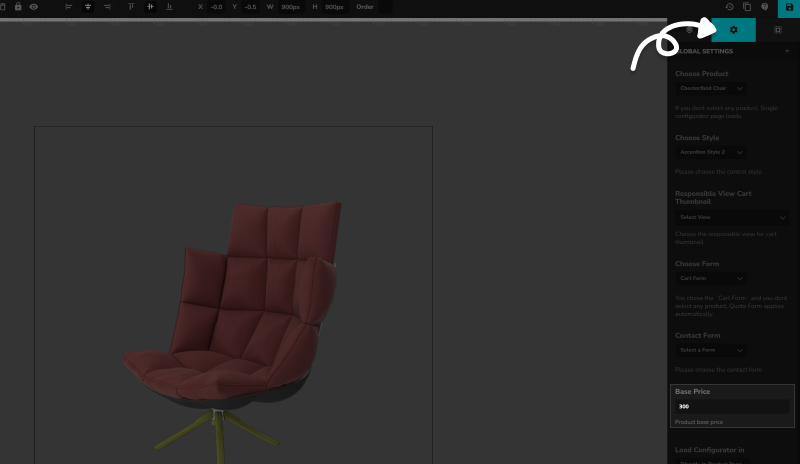
Why this matters: Whatever price you set in the WooCommerce product page won't be used. The configurator completely controls pricing calculations.
Configure Form Type for WooCommerce
After setting your base price, you need to configure the form type to enable WooCommerce integration. This is where most people get confused.
In the same Global Settings tab:
- Find the "Choose Form" dropdown
- Select "Cart Form" (this option only appears if WooCommerce is installed)
Form options explained:
- Quote Form: Simple form for quote requests
- Cart Form: Add to cart button with quantity (WooCommerce integration)
- Contact Form: Custom form using Contact Form 7 plugin
⚠️ Critical Setting: You must select "Cart Form" to enable WooCommerce add-to-cart functionality and proper checkout integration.
Step 3: WooCommerce Integration Testing & Launch (30 Minutes)
Testing is where you catch problems before customers do. I've seen configurators that worked perfectly in the editor but broke during WooCommerce checkout.
Complete Testing Checklist
Desktop testing (15 minutes):
- Preview your configurator
- Test every option combination
- Verify pricing calculations are correct
- Check image loading speed (under 3 seconds)
- Test add to cart → WooCommerce cart process
- Complete a test purchase through checkout
Mobile testing (10 minutes): This is critical - 67% of web traffic is mobile.
- Open on actual phone (not browser resize)
- Can you easily tap all options?
- Can you see product details clearly?
- Does add to cart work on mobile?

WooCommerce Cart Integration Verification
Test the complete flow:
- Configure a product with several options
- Add to cart and go to WooCommerce cart
- Verify: Product shows with all selected options listed
- Verify: Price matches configurator calculation
- Proceed through checkout
- Check: Order details in WooCommerce admin show all options
Essential WooCommerce Configurator Addons
Here's the reality: the base WP Configurator works, but it's like having a smartphone without apps. These addons transform basic functionality into professional sales tools.
Stock Addon: Never Oversell Again ($59)
Real disaster: A furniture client oversold walnut wood by 15 pieces during Black Friday. Result? $15K in refunds and 8-week delays.
How it prevents disasters:
- Tracks inventory at individual option level
- Automatically hides out-of-stock choices
- Syncs with WooCommerce stock management
- Prevents overselling during sales events
Critical for: Custom furniture, print-on-demand, fashion with limited fabrics
Range Addon: Dynamic Pricing Made Simple ($59)
Game-changer scenario: A print shop owner spent 3+ hours daily calculating custom pricing. The Range Addon reduced this to 15 minutes with automatic calculations.
Perfect for dimension-based pricing:
- Per square foot (flooring, signage)
- Per linear foot (fencing, fabric)
- By weight (shipping, metal work)
WooCommerce benefits: Real-time pricing integrates with tax calculations and shipping methods.
Premium Skins: Design That Converts ($59)
A/B testing results: A luxury handbag brand saw 51.6% higher conversions with Vogue Skin vs. default skin. ROI: 2,347% (paid for itself in 3 days).
Mobile optimization: Premium skins are responsive-first, crucial when 60%+ of WooCommerce traffic is mobile.
→ Get Free Vogue Skin (Worth $59)
Ready to Implement This?
The fastest way to see results is starting with proper image preparation this weekend. That's your biggest time investment, but it's what separates amateur configurators from professional ones.
Quick Results: What to Expect
First week:
- Monitor for technical glitches
- Track which options customers choose most
- Compare conversion rates to baseline
First month:
- Typical improvement: 40-60% conversion rate increase
- Average order value usually increases 20-35%
- Customer support tickets decrease 30-50%
Real client result: The furniture store I mentioned went from 1.8% to 6.4% conversions in 6 weeks, generating an additional $260K in revenue from the same traffic.
Continue Your WooCommerce Configurator Journey
This tutorial covers the essential setup, but there's much more to master for advanced implementations.
Next Steps:
- Complete WooCommerce Configurator Guide 2025 + Free Audit - Deep dive into advanced strategies, conditional logic, and enterprise implementations
- 7 WooCommerce Configurator Problems That Kill Sales - Fix common issues before they hurt conversions
Tools You'll Need:
- WP Configurator Pro - Core WooCommerce integration ($79)
- Essential Addons - Stock, Range, and Premium Skin
- Optional: Professional Setup Service for complex implementations
💪 Take Action Today
Don't let configurator confusion hold back your WooCommerce business growth. Start with image preparation this weekend - that's your foundation for everything else.
→ Download Free Vogue Skin (Worth $59)
→ Schedule Free Consultation
→ Get Professional Setup Service
Your WooCommerce customers are waiting to see their perfect custom products. Give them the visual experience they deserve.

